Start with a block that has two clear sides
The traditional Log Cabin block begins with a small centre square. Strips are added around it in sequence, building outward like the logs of a cabin. For the layouts in this guide, the important feature is contrast: one diagonal half of each finished block reads as light, while the other reads as dark. Turn the block, and those two halves point in a new direction. Repeat that choice across a quilt, and the blocks form a larger pattern.
Choose fabrics by value as well as colour. Value describes how light or dark a fabric appears. A pale blue and a pale cream, for example, may work together on the light side even though they are different colours. Prints can complicate the effect: a busy print that looks dark up close may blend into the light fabrics from across a room. Lay a few candidate fabrics together and step back before cutting all your strips.
Keep the construction sequence consistent if you want the blocks to behave predictably in a layout. A simple approach is to use two light strips followed by two dark strips as you work around the centre, repeating that sequence as the block grows. Make a sample block first, identify its light and dark corners, and measure it after trimming. The sample gives you a reliable reference when you begin arranging the rest.
Build a Barn Raising layout from the centre outward
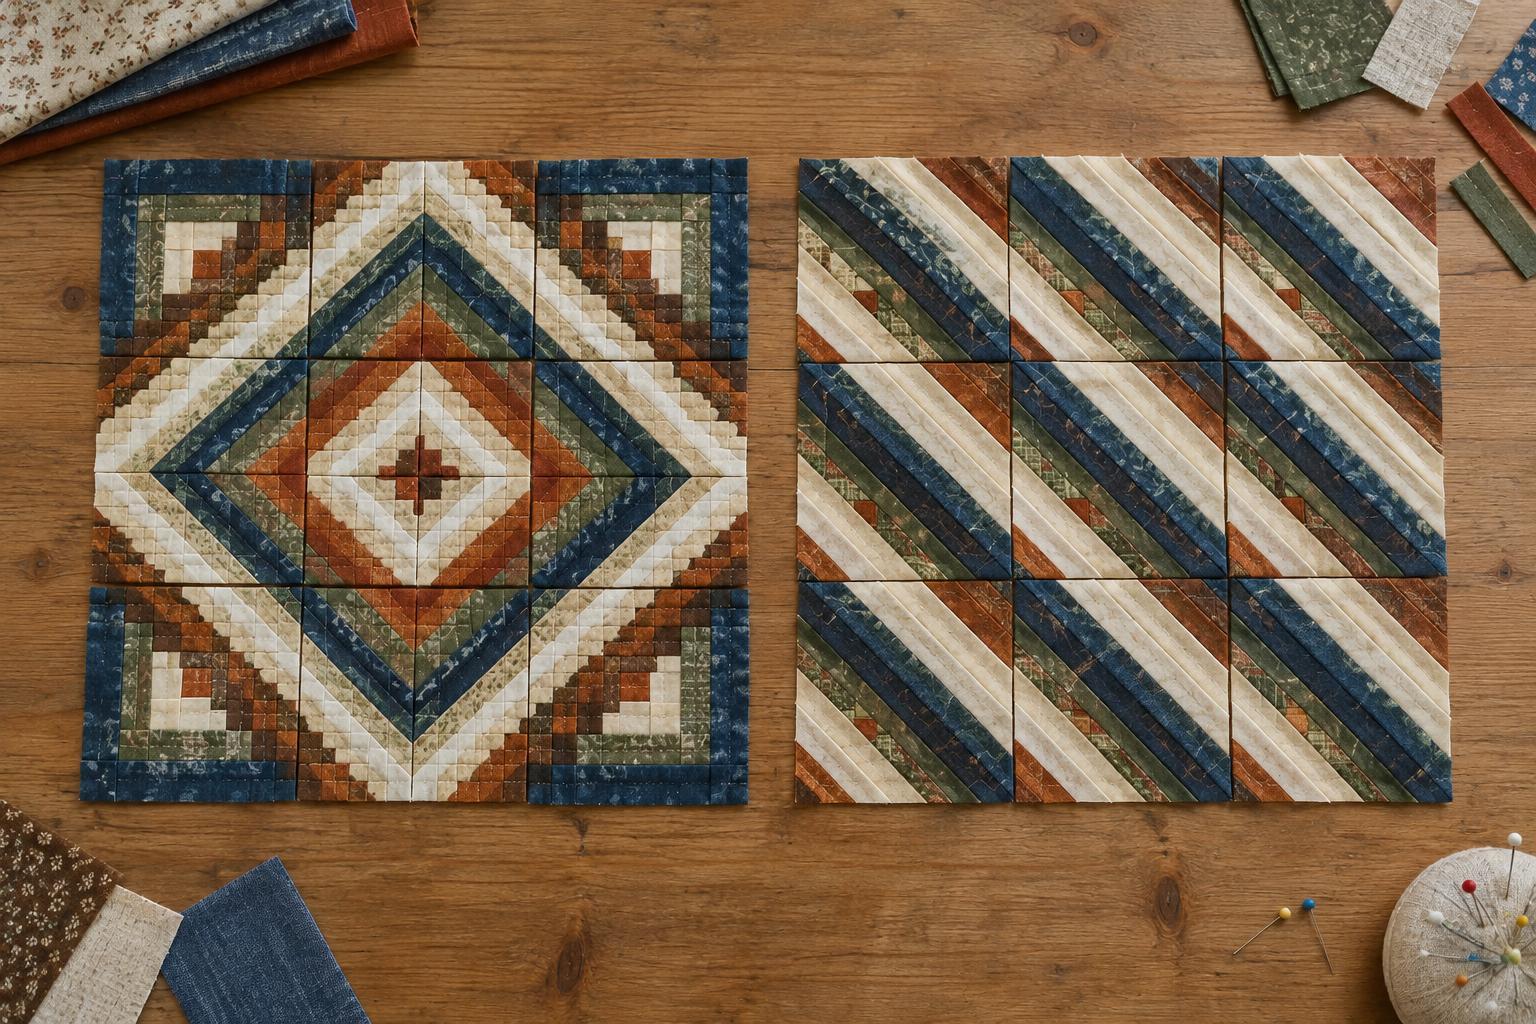
Barn Raising is recognised by nested diamond shapes. The diamonds are not pieced as separate units; they emerge when the light and dark portions of neighbouring Log Cabin blocks meet. A layout can have a strong dark diamond against a light field, the reverse, or several alternating rings. Which effect appears depends on the orientation and value of the blocks.
To plan one, clear enough floor or table space to see the whole arrangement. Begin near the middle of your block grid and rotate the central blocks until their matching light or dark portions form the centre you want. Place the surrounding blocks one at a time, turning them so their light and dark edges continue the next diamond ring. Check the design after every ring rather than assuming that all blocks in a row need to face the same way.
An even-numbered grid gives you a useful starting point because four blocks meet at its centre. For a small study, try arranging sixteen identical blocks in a four-by-four grid before committing to a larger quilt. Take a photograph once the diamonds read clearly; it will serve as a placement guide when you pick the blocks up for sewing.
Create diagonal movement with Straight Furrows
Straight Furrows uses the same light-and-dark blocks to make parallel diagonal bands instead of diamonds. The eye follows repeated dark areas in one direction and light areas alongside them, much like long furrows crossing the quilt. It is an effective layout when you want movement without a single central focal point.
Begin with one block and decide which diagonal you want the bands to follow. Add blocks beside and below it, rotating each so the dark portions connect into a continuous diagonal path. Continue across the grid, checking that the light portions form parallel paths rather than isolated patches. If a band suddenly widens, narrows or stops, a block may need a quarter-turn or half-turn.
You can alter the rhythm without changing the basic layout. Blocks with wider strips give each band a bolder, simpler appearance; narrower strips introduce more texture. Keeping the darkest fabrics within a similar value range helps the furrows remain visible, while varied prints and colours prevent them from looking too uniform.
Compare the layouts before joining the blocks
Try both arrangements with the same set of blocks. Barn Raising tends to draw attention toward the centre and rewards careful planning of each ring. Straight Furrows carries the eye across the quilt and can make an assortment of blocks feel connected. Neither requires a different block pattern, so you can experiment freely until sewing begins.
Look at the arrangement from a distance, or view a photograph at a small size. This makes the larger shapes easier to judge than they may be when you are standing directly over the blocks. If one fabric interrupts a diamond edge or diagonal band, first try moving that block elsewhere. You may not need to replace it; its print might simply work better in a less prominent position.
Keep the chosen pattern intact during assembly
Once the layout is settled, label the rows and note which edge is the top of the quilt. A quick sketch or photograph can help you restore a block that gets turned accidentally. Sew the blocks into rows, checking their orientation before each seam, then join the rows. Consistent seam allowances and evenly trimmed blocks make those intersections easier to align.
Press seams in a way that helps the blocks lie flat, adjusting the direction where bulky strip seams meet. Before adding borders or moving on to quilting, spread out the finished top for one last check. The pleasure of these layouts is that a simple repeated block produces two distinct designs: turn the blocks toward the centre for Barn Raising, or guide them across the quilt for Straight Furrows.


