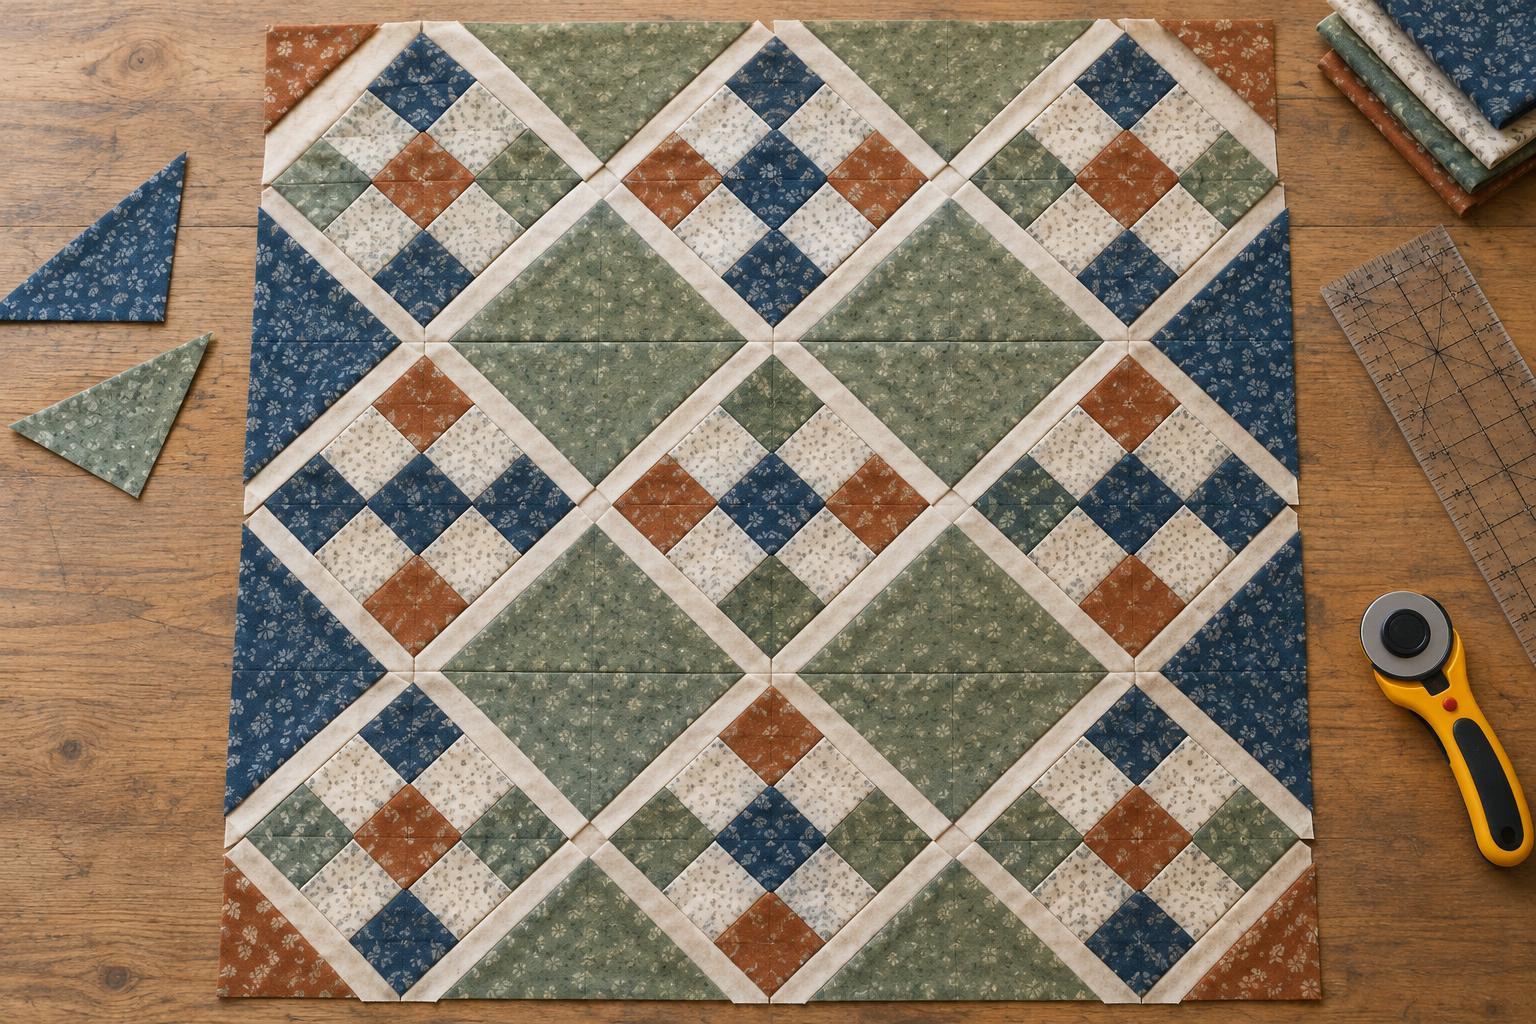
What changes when blocks turn on point
A block is set on point when it sits like a diamond, with its corners pointing up, down and sideways. This arrangement can give familiar patchwork blocks a fresh rhythm. It also leaves triangular gaps between the blocks and the straight outer edges of the quilt top. Fabric pieces called setting triangles fill those gaps.
There are two types to plan: side triangles, which fill the larger gaps along the edges, and corner triangles, which complete the four corners. They are cut differently so that the exposed edges of the quilt top follow the fabric’s straighter grain rather than its more flexible bias grain. That distinction helps the top keep its shape while you assemble it and add borders.
Before cutting, sketch the full layout on graph paper or arrange the blocks on a design surface. Mark every triangular space. A sketch makes it easier to check the number of pieces you need and to see how a print, colour or directional fabric will appear around the outside.
Measure the block and count the gaps
Use the finished size of one block for the calculations below. Finished size means the dimension the block will occupy after it is sewn into the quilt; it excludes the seam allowances. For example, a block that measures 8½ inches across before assembly has a finished size of 8 inches, assuming quarter-inch seams. If your blocks vary, check and square them up as needed before calculating.
Count the side spaces on your layout and divide by four, rounding up to a whole number. Each square cut for side triangles makes four pieces. For an ordinary rectangular on-point layout with four complete corner spaces, you will also need two squares for corner triangles: each square makes two pieces. Count from the actual layout rather than relying on the number of blocks alone, especially if you are using partial blocks, sashing or an unusual outline.
Cut side triangles with a stable outer edge
To find the square size for side triangles, multiply the finished block size by 1.414, then add 1¼ inches. Round the result up to a convenient cutting increment. For an 8-inch finished block, the calculation gives about 12.56 inches, so you would cut a 12⅝-inch square. Cut the square diagonally from corner to corner in both directions to make four triangles.
Each side triangle has one long edge that comes from an original edge of the square. Place that straight-grain edge along the outside of the quilt. The two shorter, bias-cut edges join the blocks. Handle those cut edges gently: avoid pulling them as you pin or sew, and press by lifting and lowering the iron rather than sliding it across the fabric.
A side triangle may look larger than its gap when you first place it beside a block. Seam allowances account for some of that difference, and the triangle points extend beyond the seam. Align the pieces at their intended seam intersections, not by trying to make every raw edge end at the same point.
Cut corners separately
Corner triangles need a different square size and only one diagonal cut. Multiply the finished block size by 0.707, then add ⅞ inch; round up to a convenient cutting increment. With an 8-inch finished block, the result is about 6.53 inches, so a 6⅝-inch square is suitable. Cut two squares of that size, then cut each once diagonally to produce four corner triangles.
The two sides that came from the original square edges form the outer edges at each quilt corner. The diagonal, bias-cut edge is sewn toward the blocks. Cutting corner squares twice diagonally instead would put bias edges on the outside, where they are more likely to stretch during handling.
Assemble and check the top before trimming
Lay out the blocks and triangles in diagonal rows. If the blocks contain directional prints, check their orientation now; turning a block on point can change which way a motif appears to face. Sew the pieces within each row, then join the rows, matching block corners and seam intersections. Add the corner triangles where the layout calls for them.
Press seams with care and check that the top lies flat. The setting triangles will usually leave small points extending beyond the seams. Wait until the top is assembled before trimming those extensions, and leave a quarter-inch seam allowance beyond the block points so a later border or binding seam will not cut them off. A final check of the outer edges gives you a steadier starting point for the next stage of the quilt.


